There are 4 different models in the Google Pixel 4 series – 4, 4 xl, 4a & 4a 5G. They were all launched with Android 10 and are now updated to Android 12.
The Factory Reset Protection (FRP) on Pixel 4 comes into effect when you hard reset the phone via recovery mode.
We normally perform a factory reset within the Settings app. Only when locked out, you use the volume down & power keys to reset using recovery mode. After the reset, during the device setup, you need to verify with the last synced Google account.
In this post, we are going to use the latest 2021 method, to bypass the Google lock on Pixel 4/4a/4 xl/4a 5G running on Android 11. In a few minutes, you’ll be able to use your phone once again.
So, let’s begin the troubleshooting –

I did a factory reset using the volume down & power keys on my Pixel 4. After the reset, it brings me to the “Hi There” screen.
Let’s click “Start” to begin the device setup.

In the next step, we need to connect our Pixel device to a Wifi network.
The phone is now connected to the internet. It’s getting ready, we need to wait for a few minutes.

After some time we have landed on the “Copy apps & data” page. Choose “Don’t copy” to move ahead.
This time we are on the password verification page. It’s asking for the lock screen password. I don’t remember the password. The 2nd option is – Use my Google account instead.

Now, we have reached the “Verify your account” page. It’s asking to verify with the previously synced Google account.
We are going to use the latest 2021 hack to get past this Google lock without using a computer –
How to bypass Google account on Google Pixel 4/4 xl/4a/4a 5G Android 11 without computer
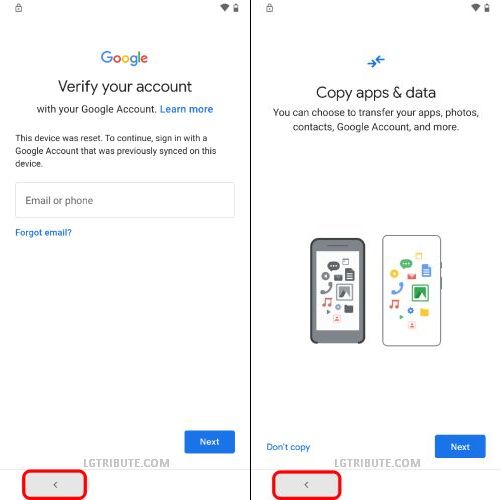
First of all, we need to go 2 steps back from the “Verify your account” screen to the “Connect to Wifi” page.

We are on the “Connect to Wifi” page.
Click on “See all Wifi Networks” > “Add new network”.
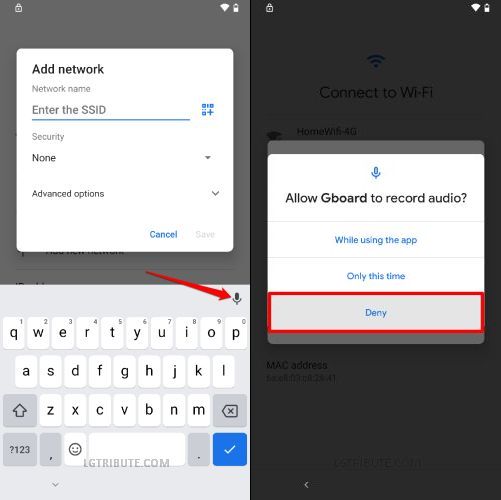
When the keyboard appears on the screen, tap the “microphone icon” at the top-right corner.
A pop-up request appears on the screen. Choose “Deny”.

Hit the Mic icon once again and click Deny.

Tap the Mic one last time and select the “Allow” option at the bottom-right corner.

This will bring you to the Gboard – App Info page.
Select “Permissions” and hit the “Search icon” at the top-right corner.

Enter the term settings and wait for the search results to appear.
Now scroll down to the bottom of the screen and select the last option – “Settings – App info”

Now, we are on the App Info page of the Settings app.
Tap “Open” to launch the Settings app.
In Settings, Go to “Apps & notifications” > “App Info”.

Using the App Info page, we are going to disable two apps – Android setup & Google Play Services.
First, choose the “Android Setup” app.

Click “Force Stop” to stop this app.

Now, open the “Google Play Services” app.
Hit the “Disable” button.

Tap “Disable app” to confirm your action.
Now, tap “Force Stop” as shown above.
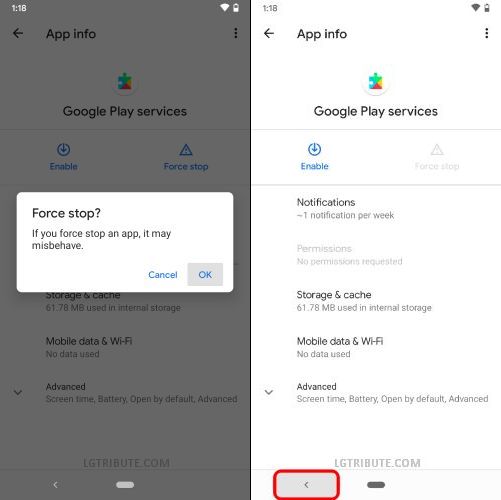
Once you’ve disabled both the apps, go 2 steps back to the Settings page.

Hit the back button 2 times.
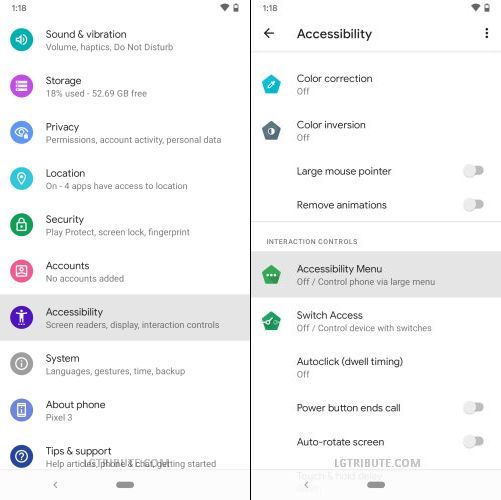
This time Go to “Accessibility” > “Accessibility Menu” as shown above.

Now, turn on the Accessibility Menu Shortcut.
Confirm your action by tapping “Allow”.

The accessibility menu shortcut is created. It stays at the bottom-right corner. We are going to use it later.
Now, go back to the first page.

Keep going back until you reach the “Hi There” screen.

Click the Start button to move ahead.

The next page is “Copy apps & data”.
Hit the back button once to reach the “Connect to Wifi” screen.

Now, click on “Set up offline” and then “Continue”.

Now, click the accessibility menu shortcut as marked in the above screenshot.
Select the first option – “Assistant”.

Now, tap “Settings” and enable the Google Play Services app.

Once the app is enabled, go back to the “Connect to Wifi” screen.

Again click “Set up offline” and then “Continue”.

This brings us directly to the Google Play Services screen. The Google verification page is gone. We have bypassed the Google account.
Accept the Google services terms and conditions.

Now, skip the screen lock setup. We can add a screen lock later.

At last, we have reached the Pixel 4 home screen.
Now, let’s disable the accessibility menu shortcut.

Open the Settings app and Go to “Accessibility” > “Accessibility Menu”.

Use the toggle switch to turn off the accessibility menu shortcut.
If stuck at any stage, feel free to leave a comment below.